The Grasshopper 2 documentation platform was designed to draw images on demand whenever possible. Partly to reduce the size of the published content, but mostly because Grasshopper supports skinning and ideally document and component previews are drawn using the local styling settings, so they match what the user sees when they look at their own Grasshopper.
Drawing images instead of shipping them also allows me to render them in very high resolution without jpeg compression artefacts and with full blown alpha channels. Especially the latter allows me to nicely blend the images into the surrounding html. But I found that they still looked oddly disjoint from the surrounding text. The default capsule style has a distinct 3D feel to it, and it was simply begging for a drop shadow.
Drop shadows are post-effects which means writing some code which (after the image is drawn using the Eto.Drawing tools) iterates over all the pixels in the high resolution image and darkens them according to the drop shadow demands. This could be quite an expensive operation, which is an issue when a documentation page containing a dozen example files is delayed by a couple of extra seconds because the images aren’t done rendering yet. So I needed an effect which looks good and is very fast to compute. As everyone knows good and fast are the best of friends.</sarcasm>
The standard drop shadow effect is to take the original image, convert all pixel colours to pure black while retaining the alpha channel, then blurring the blackened copy, possibly offsetting it in x and y and then superimposing the original image on top, leading to something akin to this:
The visual quality if this effect goes up with increasing blurring radius, but that sadly also makes it slower. Furthermore it requires the creation of a duplicate of the original image and an offset which, unless you’re really willing to juggle blocks of bytes around in memory, is another full loop over all pixels. Altogether a pretty poor score on the shitty+slow ←→ lovely+fast spectrum.
I started looking around for photoshop tutorials or plug-ins which could create better looking drop shadows, and hoping that I could reverse engineer their algorithms. And Lo, there’s RealLookLongShadow; a Photoshop compliant plug-in by Denis Yanov. I mean just look at that!
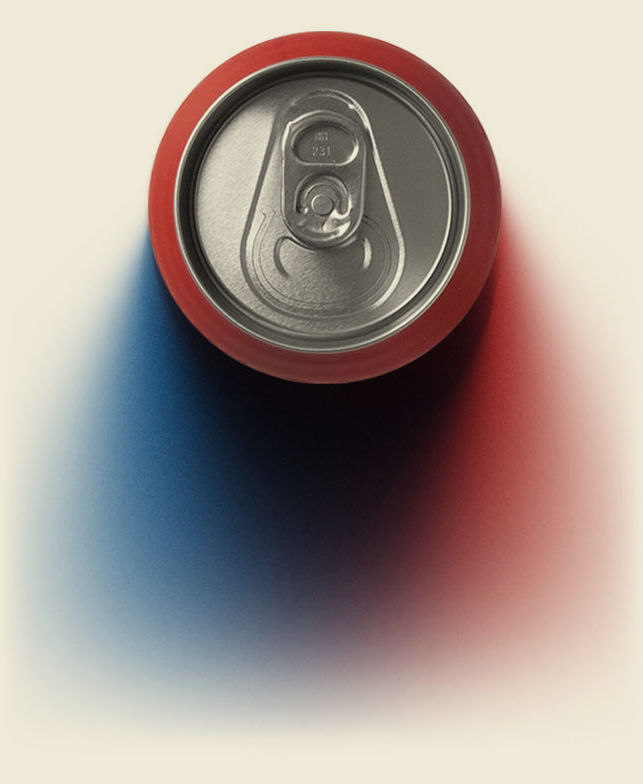
That’s about as good as it gets, but of course it is not fast. From what I can work out from the very summary information about this, it basically works by superimposing dozens—if not hundreds—of very faint copies of the original image using slowly increasing blurring radii. Which is fine if you’re crafting an illustration to be viewed in the distant future, but it’s very much not fine if you’re trying to provide real-time images. Luckily Yanov’s plug-in does a lot of things I have no need of, so there may be some optimisations lurking in the shadows1.
First of all I don’t need coloured or multiple light sources. Also all my shadows are going straight down, no need for angling. So it occurred to me that since my shadows only go downwards, they could in fact be processed row by row from top to bottom. Also, since the shadows directly next to objects are sharp and do not require any blurring, I can operate on the original image directly without cloning it in memory.
So let’s write the simplest possible version of what I have in mind:
- Iterate over all the rows in the image from top to bottom.
- Compute the shadow intensity of every pixel to equal the opacity of the pixel directly above it.
- Combine the computed shadow intensity with the original pixel. If the original pixel is fully opaque it always remains intact, if it’s partially transparent, it is overlaid on the shadow colour.
public static void DropShadow(this BitmapData data, float darkness)
{
  int w = data.Image.Width;
  int h = data.Image.Height;

  // Declare two float arrays whose length equals the image width.
  var shadowRow0 = new float[w];
  var shadowRow1 = new float[w];

  // Populate the first array with the opacities of the topmost pixel row.
  for (int x = 0; x < w; x++)
    shadowRow0[x] = data.GetPixel(x, 0).A;

  // For every subsequent row, draw drop shadows.
  for (int y = 1; y < h; y++)
  {
    // Rows must be handled in a one-by-one controlled fashion,
    // but columns can be done in parallel.
    System.Threading.Tasks.Parallel.For(0, w, (x) =>
    {
      var pixel = data.GetPixel(x, y);

      // Copy the opacity from the row above, but never exceed 'darkness'.
      var shadowAlpha = Math.Min(shadowRow0[x], darkness);

      // Overlay the original colour on top of the shadow colour.
      var finalColour = ShadowUnderneath(pixel, shadowAlpha);
      data.SetPixel(x, y, finalColour);

      // Store the opacity of the current pixel in the second array.
      shadowRow1[x] = finalColour.A;
    });

    // Swap the float arrays so they're only constructed once.
    (shadowRow1, shadowRow0) = (shadowRow0, shadowRow1);
  }
}
Using a strong darkness value of 0.8f, we get a good sense of what the algorithm is doing. Which, so far, is not great. Shadows ought to become less dark as they are further away from the object. We can add a decay argument to the function and reduce the shadow alpha value by that decay whenever it is copied from the row above.
public static void DropShadow(this BitmapData data, float darkness, float decay)
{
  ...
  var shadowAlpha = Math.Min(shadowRow0[x], darkness) * decay;
  ...
}
Obviously I’m just putting off the hard bit, which is to progressively blur the shadow based on its length. I’m not actually keeping track of lengths and I happily don’t have to. Instead of copying the shadow intensity from the pixel directly above the current pixel, I can take the average of several pixels to the left and the right, and thus introduce automatic blurring. Since the function is fairly different now, I’ll include it in its entirety:
public static void DropShadow(this BitmapData data, float darkness, float decay)
{
  var kernel = ShadowKernel(decay);
  var radius = kernel.Length / 2;

  int w = data.Image.Width;
  int h = data.Image.Height;

  var shadowRow0 = new float[w];
  var shadowRow1 = new float[w];

  for (int x = 0; x < w; x++)
    shadowRow0[x] = data.GetPixel(x, 0).A;

  for (int y = 1; y < h; y++)
  {
    System.Threading.Tasks.Parallel.For(0, w, (x) =>
    {
      var pixel = data.GetPixel(x, y);

      // Compute the opacity of the shadow at this pixel based
      // on the kernel defined above. Accumulate the shading.
      var shadowAlpha = 0f;
      for (int offset = -radius; offset <= radius; offset++)
      {
        var sx = x + offset;
        // Take care not to exceed the image dimensions.
        if (sx >= 0 && sx < w)
        {
          var weight = kernel[offset + radius];
          shadowAlpha += Math.Min(shadowRow0[sx], darkness) * weight;
        }
      }
      var finalColour = ShadowUnderneath(pixel, shadowAlpha);
      data.SetPixel(x, y, finalColour);
      shadowRow1[x] = finalColour.A;
    });

    (shadowRow1, shadowRow0) = (shadowRow0, shadowRow1);
  }
}
The mysterious ShadowKernel(float decay) function just return an array of numbers whose sum-total adds up to the decay value. By multiplying the kernel with the decay, we can get rid of a multiplication in the per-pixel looping. Here’s a symmetric kernel consisting of seven values which roughly follows a Gaussian distribution:
private static float[] ShadowKernel(float decay)
{
  return new[] {
    0.05f * decay, // Weighting for the pixel 3 steps to the left.
    0.10f * decay,
    0.15f * decay,
    0.40f * decay, // Weighting for the central pixel
    0.15f * decay,
    0.10f * decay,
    0.05f * decay  // Weighting for the pixel 3 steps to the right.
  };
}
I actually wrote several kernels for widths 1, 3, 5, and 7, but since this function runs in mere milliseconds on images with several million pixels, there was no need to settle for a smaller kernel. In fact it’s possible to create an asymmetric kernel and reintroduce angled drop shadows with fairly minimum effort, or create a kernel with two peaks, thus casting two angled shadows at once. However angled shadows have the issue that they might run into the edges of the image, causing a sharp cut-off which looks awful unless the image is displayed exactly as wide as the frame it’s displayed in.
The same issue happens along the bottom edge of the image. If the shadows haven’t completely petered out by the time the final row is handled the result has a visible edge. To mitigate this I’ve added a few lines of code to artificially suppress the shadow opacity in the bottommost rows.
- Get it? ↩︎


Leave a comment